Clients
Clients list
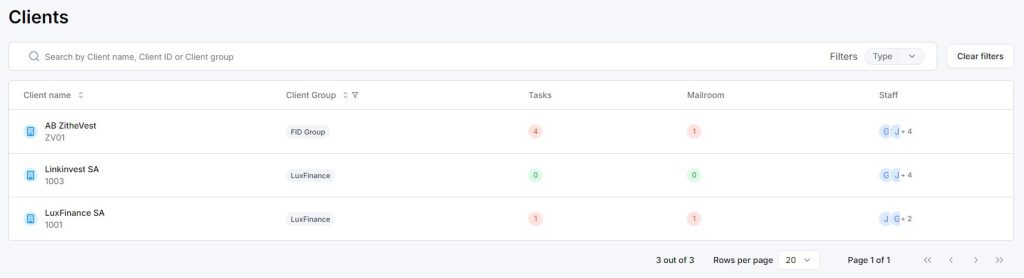
The client menu allows you to visualize the list of all the clients you are staffed on. On this page, you will be able to :
- Search clients by name, client ID or Client group using the searching bar
- Filter clients by type or client group using the filters
- Visualize the number of tasks open for one client and click on it to be redirected to this list
- Visualize the number of document in the mailroom with status « New » and « Pending » and click on it to be redirected to this list
To view the client’s form, click on the client’s name in the list.
Company and Individual
Two different types of clients can be created: Company or Individual.
The only differences on the platform between these two types are their distinct file plans and the fact that the fields below are conditional based on the client type.
Company
- Incorporation Date
- RCS Number
- Tax Number
- Subject To VAT
- VAT Number
Individual
- Date of Birth
- Birth Place
- Nationality
- Marital Status
- Number of Minor Children
- Number of Adult Children
- TIN / NIF
Client form
The client’s form is composed of several tabs:

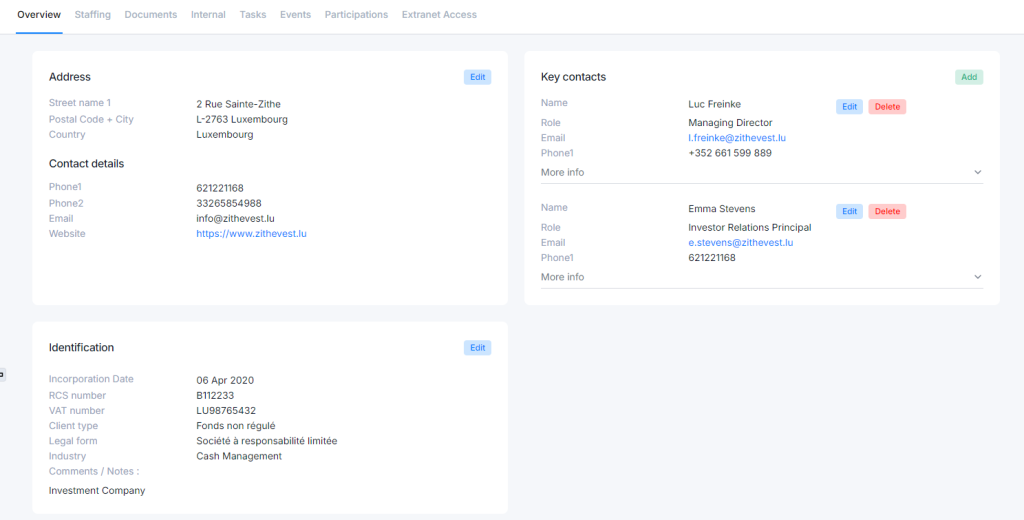
- Overview : Manages the keys informations of the client, bank accounts and address of his accounting platform
- Staffing : List all users staffed on the client and allows staffing management.
- Documents: List all the documents in the client’s file plan and enable multiple actions, such as uploading or downloading files.
- Internal: List all the working documents associated with the client and enable the transfer of the working document into the client’s file plan.
- Workflows: Lists all tasks assigned to the client and allows the creation of new tasks and workflows.
- Events: Shows all planned events related to the client and allows the creation of new events.
- Participations: Lists all participations of the client and allows the creation of a new participation.
- Extranet Access: List all external users with access to the client’s information and allows the management of these external users.
Overview – Bank accounts

Key information
In the first part of this tab, you will have the ability to modify the client’s address, contact information, add key contacts, or specify all of their identifiers.
Bank accounts
In this section, you can view the client’s bank accounts, as well as add, modify, or close an account.
Create a new bank account
When a bank account is created, a folder corresponding to this account will automatically be generated in the client’s file plan, limited to the current year.
Add an existing account to a new year
You also have the option to add this bank account in another year by including it in the file plan. Simply click on ‘+ [Bank]’ and select the bank account you wish to add.
Note
If a bank account is closed, it will no longer appear in the list of bank accounts in subsequent years.
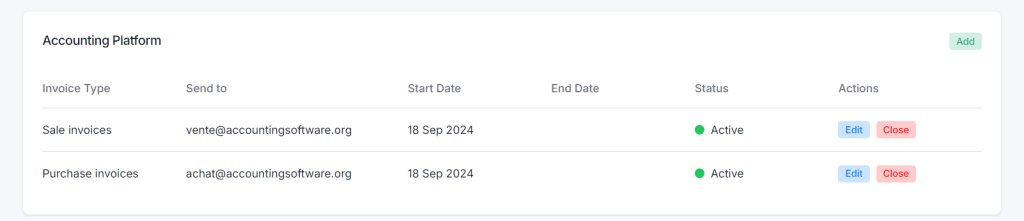
Accounting Plateform x Sage Cloud Demat
The Accounting platform section will allow you to configure sale or purchase invoice addresses in order to automatically send documents to these addresses. You have the ability to view, edit or deactivate the sale and purchase invoice address in this section.
To automatically send invoices to an email address (sale or purchase), please follow these steps :
- Configure a sales invoice address (or a purchase invoice address) for this client.
- Select a document you want to send to the client’s sale invoices address (or purchase invoices).
- Create a new task for this document with the category ‘Sale invoices’ (or ‘Purchase invoices’).
- Save this task.
- The document will be sent directly to the encoded sale invoice or purchase invoice address, and the task will be automatically closed.
Note
The invoice and purchase addresses entered may refer to the Sage Cloud Demat addresses.
Staffing

This staffing tab will list all users who can access all data stored for the client.
Each user will be associated with a role configured in your application (Manager, Accountant, Corporate, BA, etc.). It will be mandatory for each client to have at least one Manager.
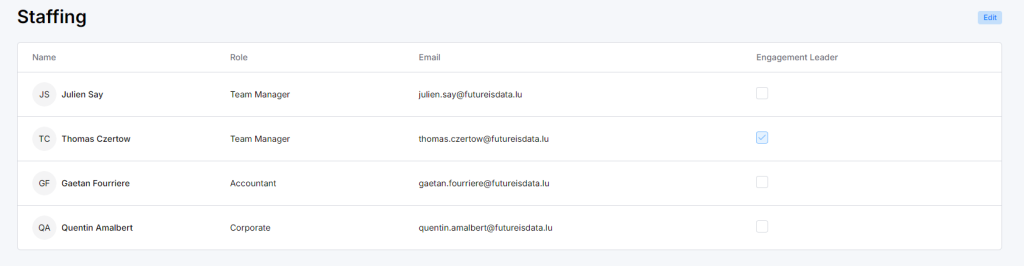
Selecting an Engagement Leader will display his name in the client’s main information banner. This information will also be visible to extranet users.

Here are the differences between Manager and Ops roles :
| Manager | Ops | |
|---|---|---|
| Client | Can only see clients in staffing portfolio | Can only see clients in staffing portfolio |
| Can edit staffing and extranet user access | Cannot edit staffing and extranet user access | |
| Can edit any client info except Static information (Name, client id, client group, engagement entity) | Can edit any client info except Static information (Name, client id, client group, engagement entity) | |
| Workflows | By default, see the list of all tasks in its client portfolio | By default, see only tasks assigned to their user |
| Can edit any task in client portfolio to manage work allocation | Cannot edit task if they are not assigned to the task |
Extranet Access

This section will list all extranet users who have access to part of the data stored for the client.
Once a user is part of the client’s extranet user list, they will have permissions that differ from those of an internal user.
- Extranet user will be able to:
- Vizualize part of the information in the client form:
- Overview tab (except for the ‘Additional Comments / Notes’ fields).
- Documents tab. The user will be able to download documents and copy the document links.
- Events tab.
- Participations tab.
- Vizualize part of the information in the search tab of document menu:
- Use the Search tab in the document menu to view and download only the documents linked to clients they are associated with.”
- Use the Search tab in the document menu to view and download only the documents linked to clients they are associated with.”
- Vizualize part of the information in the client form:
- Extranet user will not be able to:
- Vizualize part of the information in the client form:
- ‘Additional Comments / Notes’ fields in Overview tab.
- Workflows tab.
- Staffing tab.
- Extranet user tab.
- Internal tab.
- Visualize the Workflows menu.
- Access part of the functionnalities of the Documents menu:
- Modify or delete a document in the Search tab.
- View documents in the Mailroom tab.
- Modify or delete an Event.
- Vizualize any informations about a client for which they are not an extranet user.
- Vizualize part of the information in the client form:

Workflows

In this tab, you will be able to create workflows and tasks and see the list of all tasks related to the client.
To view the details of the features, click the button below. All functionalities will be the same as those explained on this page, but in the client form, they will be specific to the individual client rather than cross-client.
Events

Event creation and search
In this tab, you’ll find a list of all events related to the client, allowing you to track key activities and milestones.
You can search by event title, filter the results by date or category for easier navigation.
When creating an event, you can associate one or more documents to each event by uploading it at the bottom of the event form. You will need to classify each document before saving the event.
Whenever one or more documents are linked to an event, a paperclip icon will appear next to the task event to indicate that a document is attached to the event.

- You can view the document by clicking on the eye icon next to the document name, in the event form.

Important
The event and the document must be associated to the same client
Note
You can create an event using two modules : Clients and Documents
Participations

In this section, you will have the ability to view the client’s participations. You can add a participation or modify an existing one.
When a participation is created, a folder corresponding to this participation will automatically be generated in the client’s file plan.
Documents
In the client menu, you will have two tabs related to the documents:
- The Public section : Documents
- The Internal section : Internal
| Features | Public Section | Internal Section |
|---|---|---|
| User access | This section is available for individuals who are staffed on the client. | This section is available for individuals who are staffed on the client. |
| Extranet user access | This section will be visible to extranet users. | This section will not be visible to extranet users. |
| File Plan | The File Plan is fixed for all clients. It will not be possible to modify, add, or delete a folder from OneDrive or from the application. Only the pre-created parts of the File Plan will be added, such as Years, Bank Accounts, and Participations. | A default File Plan is generated for all clients. It will be possible to rename, add, or delete folders from OneDrive. |
| Document management in OneDrive | It will not be possible to modify, add, or delete a document from OneDrive. | It will be possible to modify a document from OneDrive or the application. |
| Document management in D360 | It will be possible to upload a new document, reclassify, rename a document. | It will be possible to move a document from Internal to Public. |
Public section : Documents

To view the details of the features, click the button below. All functionalities will be the same as those explained on this page, but in the client form, they will be specific to the individual client rather than cross-client.
OneDrive Synchronization
To allow you to access both internal and public documents directly from your file explorer, you have the option to synchronize OneDrive with the platform.
OneDrive synchronization ensures that changes made to files in either location (your file explorer or D360) are reflected in real-time across both.
Activate OneDrive Synchronization
To activate OneDrive synchronization :
- Go to Clients, Documents and click on the Sync button
- After clicking on the Sync button, confirm by following the Microsoft One Drive instructions.
- All the client folders you have just synchronized will appear in your file explorer
Note
If changes are made in D360, they will be reflected in your file explorer, and vice versa. But synchronization may sometimes take a few minutes.
Internal section : Internal

The internal section will allow you to work on documents without external users being able to see them. Only users staffed to the client will be able to see this section.
In this tab, you can search for a document and view it. If the document is part of the Office 365 suite, you can edit it directly using the online applications.
Note
To easily find a document from the platform, use the search bar to look for it by the document name, created by, or path.
Working on documents
By syncing the client with OneDrive, you will be able to modify the entire structure of the file plan of the Internal part by adding new folders, renaming them, and adding new documents.
Documents can be edited through OneDrive using File Explorer, as well as through the platform if they are part of the Office 365 suite. In this case, the document will open in the online applications:
Classify document from Internal to Public
Once the working document is finished, it can be moved to the Public section of the client. To do this, go on the platform, click on the document in the Internal section and select the classification plan before saving. It will be automaticaly remove from the internal part.
Note
The document will remain visible in the Internal section for a few minutes due to the synchronization delay before it disappears.