Documents
Search
Simple search

The Search section lists all of the client’s public documents.
By default, it consolidates all documents from the clients you are assigned to. To make the search easier, if you want to search for documents from a specific client, you can select the client you are interested in using the field “Select a client”.
Note
After selecting a client, the file plan will be displayed on the left side of your screen to improve your experience
To simplify document searches, the simple search feature allows you to:
- Search by the document’s name
- Search by the document’s ID
- Search by the document’s date
Advanced search

With the advanced search, you can filter your search results using additional criteria to refine your query. By selecting a client, their file plan will be displayed to facilitate your search, and you will also be able to perform a ‘Full Text’ search to find a specific word within the document body.
Note
The ‘Full Text’ search field is only available after selecting a client for data confidentiality reasons.
File Plan
Once you select a client in the filters, the entire client File Plan is displayed on the left side of your screen. You can navigate from folder to folder to dynamically view the documents in each folder on the right side of the screen:
- If one or more documents are present in a folder or its subfolders, the name of the folder will be highlighted, and the number of documents will be shown in parentheses.
- If no documents are present in a folder or its subfolders, the name of the folder will remain grayed out.
Certains parts of the File Plan will be dynamic and will be generated automatically based on what has been entered at the client level. These parts are marked in the file plan using brackets [XX]:

Clicking on [YYYY] will automatically create the following year in the File Plan.

Clicking on [Bank] will display a list of existing bank accounts (created in the “Overview” tab).
By selecting the desired account, a folder for that bank account will be automatically created.

Clicking on [Participation] won’t do anything.
Participation folders are automatically created when you add a participation in the client’s Participation tab.
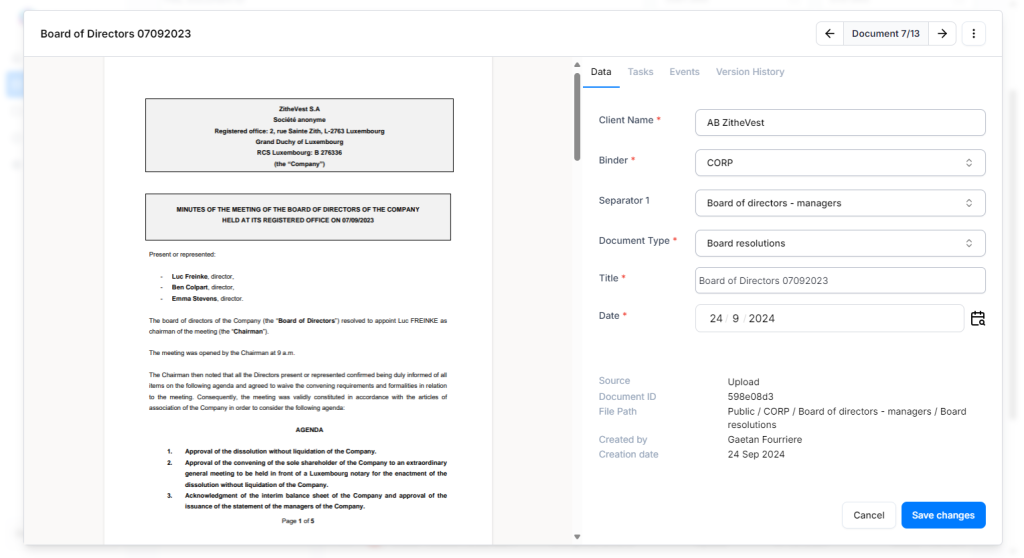
Document Preview
By clicking on the document title, a preview of the document will open. You will be able to:
- View the document preview on the left
- View and modify the document classification
- View and modify the name and the date of the document
- View the document’s metadata
- By clicking on the “Tasks” tab, view the tasks associated with the document and add new tasks to it.
- By clicking on the “Events” tab, view the event associated with the document and add one new event to it.
- View a count of documents on the top right hand corner to navigate through the folder or the search results list.
- Perform action by clicking on the 3 dots icon (all actions are explained in the next section)
Action on a single document
To perform action on a specific documents you can both :
- From the document list, click on the 3 dots icon in the right-hand column.
- From the document preview, click on the 3 dots icon in the top right corner of the window.

The different available actions are explained below:
- Download a document :
- By clicking on « Download », the document will be downloaded and the document name will reflect its classification context : Client name – Document date – Document type – Title document
- Copy the link of a document :
- By clicking on “Copy link,” the document link will be copied directly to your clipboard, allowing you to simply paste it into your browser’s URL bar to access it. You will be redirected to the client form in the Public tab, at the appropriate level of the file plan.
Note
You can share this link with anyone assigned to the client or with extranet users assigned to this client.
- Copy a document to another location in the file plan or to another client :
- By clicking on « Copy document », a pop-up will appear, allowing you to copy the document to up to five different locations. You just need to select the client, choose the classification, and, if necessary, modify the title or date of the document.
Note
You cannot copy two documents to the same location if they have the same name.
- Edit a document :
- By clicking on « Edit », the document preview will open.
- Delete a document :
- By clicking on « Delete », the document is removed from the client files and search results.
- The document will be stored for a predetermined period in the recycle bin before being permanently deleted.
- If you wish to restore the document, ask your admin to restore it from the recycle bin. It will reappear in the location where it was deleted
Actions on multiple documents – Bulk download
To perform actions on multiple documents at once, you need to :
- Select the documents you want by checking the box next to each one.
- Click on “Action.”
- Then select “Download as a zip.”
- All documents will be downloaded as a zip and the document names will reflect their classification context : Client name – Document date – Document type – TitleBas du formulaire
Documents Upload
There are two different ways to upload a document: single upload or multiple upload. To do this, click on “Upload,” then select either “Upload single” or “Upload multiple.
Upload single :
By choosing “Upload single”, you will be able to :
- Upload a document from your File Explorer or by using drag-and-drop.
- Select the classification plan.
- Give a title to the document.
- Choose the date of the document.
You also have the option to create one or more tasks during the single upload process. Simply click on “Add new task,” fill out the task form, and then save your changes.
Upload multiple :
By choosing “Upload multiple”, you will be able to :
- Upload a document from your File Explorer or by using drag-and-drop.
- Select the classification plan.
- Give a title to the document.
- Choose the date of the document.
Important
If you first click on the folder where you want to classify your documents and then use the upload feature, the document will be classified directly at that level of the file plan, eliminating the need to select each level of the file plan.
OneDrive Synchronisation
OneDrive synchronization ensures that changes made to files in either location (your desktop or D360) are reflected in real-time across both platforms.
- To activate OneDrive synchronization, go to Clients -> Documents -> click on the Sync button
- After clicking on the Sync button, confirm by following the Microsoft One Drive instructions.
- All the client folders you have just synchronized will appear with a prefix in the company name.
- If changes are made from OneDrive, they will be reflected in D360.
- If changes are made in D360, they will be reflected in D360.
Note
Synchronization may sometimes take a few minutes.
Add document to Public part
You can add a document to the Public section in several ways:
- By moving a document from the Internal section to the Public section
- Through a single upload or a multiple upload
- Via the mailroom (see mailroom section)
Mailroom
Global Mailroom Process
The mailroom will centralize all documents from various sources, enabling users to efficiently sort and classify them so that they become available to both internal users and external users.
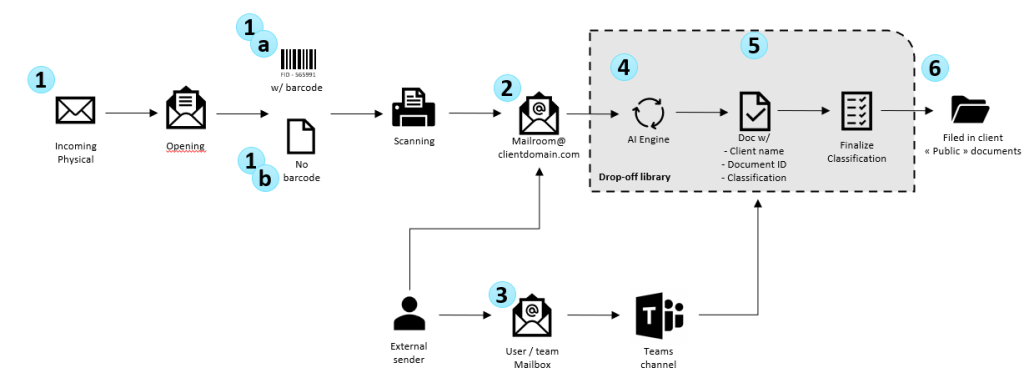
- All physical incoming documents can be scanned with (1a) or without a barcode (1b) and sent directly to the platform’s mailroom by configuring the scanner. For documents with barcodes, they can be easily retrieved on the platform by searching using the barcode number.
- All attachments sent to the configured mailroom email address will be directly stored in the mailroom for indexing.
- Upon receiving an email at a configured user or generic email address, a Teams card will be generated to allow the user to select which attachment to send to the mailroom.
- When a document arrives in the mailroom, an AI engine automatically detects the client’s name based on specific criteria, such as certain IDs and IBANs, thereby allowing for the immediate completion of the initial sorting stage.
- Scanning agents and operators must then identify the client if it was not detected by the AI and determine the classification of the document. This process is outlined in the “Classification process” part.
- Once classified, the document becomes available in the client’s Public section.
Classification process
The classification process is divided into two parts:
- The first part of the classification is carried out by the scanning agent. They can view all documents that have arrived in the mailroom and perform an initial sorting by selecting the client associated with the document.
- The second part of the classification is performed by the operators. They can view all documents that have already been sorted and assigned to the clients they are staffed on. Their task is to determine the classification of the document so that it becomes available in the client’s Public section.
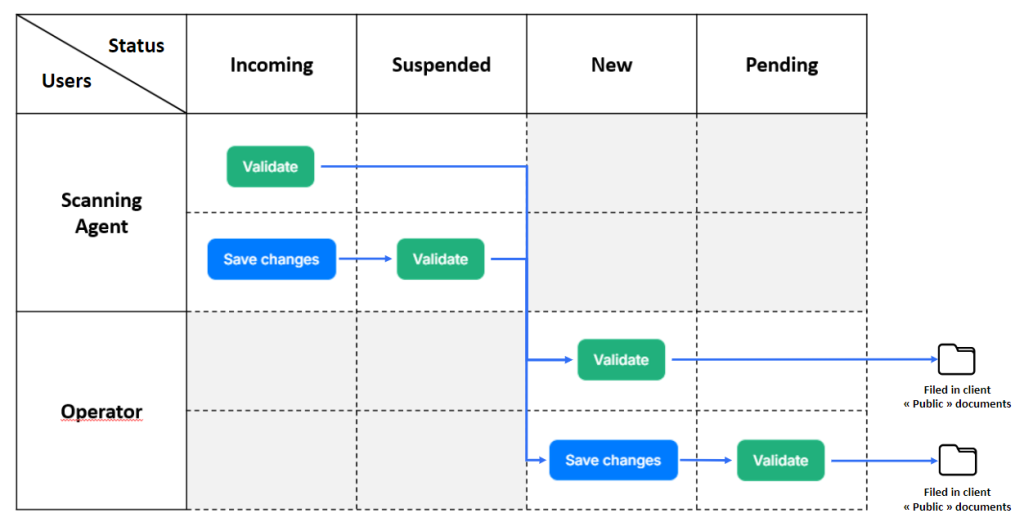
Scanning agent process
Scanning agents can see all documents displayed in the mailroom with the statuses:
- Incoming: Client to be determined
- Clicking “Validate” changes the status to “New.”
- Clicking “Save Changes” updates the status to “Suspended.”
- Suspended: Awaiting information to determine the client
- Clicking “Save Changes” updates the status to “Suspended.”
- Delete: Pending confirmation of deletion
Operator process
Operators can see all documents available in the mailroom with the statuses:
- New: Classification to be determined
- Clicking “Validate” categorizes the document under the client’s “Public” documents.
- “Clicking “Save Changes” updates the status to “Pending” and allows the user to create a task.
- Pending: Awaiting information to determine the classification. You can associate a new task with a document in pending status
- Clicking “Validate” categorizes the document under the client’s “Public” documents.
Deletion process
A document can be deleted from the mailroom if, for example, it is confidential or should not appear in the DMS. Operators will be able to delete the document by providing a reason. The document will then appear with the status “Delete”, allowing the scanning agent to confirm the deletion and move the document to the recycle bin.
- The document will be stored in the recycle bin for a predetermined period before being permanently deleted.
- If you wish to restore the document, ask your admin to recover it from the recycle bin. It will reappear in the location from which it was deleted.

Mailroom icons
To the left of each document in the mailroom, there is an icon that allows for easy identification of the document’s source :
- Scanning : The document is scanned and sent automaticaly to the mailroom address which will import the document in the mailroom.

- Mailroom : Applicable to any documents sent to the mailroom address directly. The process is the same as but the documents are not necessarily PDFs and will be sent by an email address different from the one.

- Teams : In this process, a power automate is installed on the user mailbox and will prompt a teams card in a dedicated channel, provided that the trigger conditions are met (usually email from external user, with attachments). the teams card will allow the user to select the client and the documents to be moved to the mailroom.

Special characters
Several special characters are not allowed in document names:
~ # % , & * { } \ : ; . < > ? / | ” ( ) ‘ ´ ° + = ^ [ ] @ €, $